https://docs.docker.com/get-started/overview/
容器访问宿主机
https://wiki.eryajf.net/pages/674f53/#方案二
TODO
https://vuepress.mirror.docker-practice.com/
practice https://github.com/yeasy/docker_practice
https://blog.csdn.net/mar_ljh/article/details/109011822
build https://yeasy.gitbook.io/docker_practice/image/build
https://yeasy.gitbook.io/docker_practice/
docker -t build alomerry/xxx . docker login docker push
https://yeasy.gitbook.io/docker_practice/image/multistage-builds/laravel
Install
添加当前账号到 sudoer 避免 docker 操作需要 sudo
sudo groupadd docker创建组sudo gpasswd -a ${USER} docker将用户添加到该组,例如 xxx 用户sudo systemctl restart docker重启 docker-daemon
常用命令
docker ps docker run docker images docker rmi docker stop docker rm docker history docker inspect docker tag docker build docker pull docker push
Docker Compose
Dockerfile
Layers
先来看一段官方文档上的描述:
TIP
A Docker image is built up from a series of layers. Each layer represents an instruction in the image’s Dockerfile. Each layer except the very last one is read-only. Consider the following Dockerfile:
# syntax=docker/dockerfile:1
FROM ubuntu:18.04
LABEL org.opencontainers.image.authors="org@example.com"
COPY . /app
RUN make /app
RUN rm -r $HOME/.cache
CMD python /app/app.py
This Dockerfile contains four commands. ==Commands that modify the filesystem create a layer==. TheFROM statement starts out by creating a layer from the ubuntu:18.04 image. The LABEL command only modifies the image’s metadata, and does not produce a new layer. The COPY command adds some files from your Docker client’s current directory. The first RUN command builds your application using the make command, and writes the result to a new layer. The second RUN command removes a cache directory, and writes the result to a new layer. Finally, the CMD instruction specifies what command to run within the container, which only modifies the image’s metadata, which does not produce an image layer.
Each layer is only a set of differences from the layer before it. Note that both adding, and removing files will result in a new layer. In the example above, the $HOME/.cache directory is removed, but will still be available in the previous layer and add up to the image’s total size. Refer to the Best practices for writing Dockerfiles[1] and use multi-stage builds[2] sections to learn how to optimize your Dockerfiles for efficient images.
The layers are stacked on top of each other. When you create a new container, you add a new writable layer on top of the underlying layers. This layer is often called the “container layer”. All changes made to the running container, such as writing new files, modifying existing files, and deleting files, are written to this thin writable container layer. The diagram below shows a container based on an ubuntu:15.04 image.
上面的文字清晰的说明了 layer 的几个特点:
- 在数据有变动时会添加 layer
- 顶层的容器层是可写的
看下面这个 dockerfile
dockerfile
FROM phusion/baseimage:focal-1.1.0

ENV DEBIAN_FRONTEND noninteractive
ENV HOME /root
ENV LANG en_US.UTF-8
ENV LANGUAGE en_US:en
ENV LC_ALL en_US.UTF-8

ENV NVM_DIR /root/.nvm
ARG name=vscode-web
ARG NODE_VERSION=16.16.0

RUN apt-get update; \
  DEBIAN_FRONTEND="noninteractive" apt-get install --no-install-recommends -y \
  build-essential \
  # ruby-full \
  git \
  net-tools \
  wget \
  zsh; \
  apt-get clean; \
  rm -rf /var/lib/apt/lists/* /var/cache/apt/archives/*

RUN curl -s http://cdn.alomerry.com/packages/nvm/install.sh | bash
RUN . ${NVM_DIR}/nvm.sh && nvm install ${NODE_VERSION} && nvm alias default ${NODE_VERSION} && nvm use default ${NODE_VERSION}
ENV NODE_PATH $NVM_DIR/versions/node/v${NODE_VERSION}/lib/node_modules
ENV PATH $NVM_DIR/versions/node/v${NODE_VERSION}/bin:$PATH

RUN npm config set registry https://registry.npm.taobao.org; \
  npm install -g yarn \
  RUN yarn config set registry https://registry.npmmirror.com; \
  git config --global user.name "Alomerry Wu"; \
  git config --global user.email "alomerry.wu@gmail.com"

RUN rm -rf /etc/cron.daily/apt; \
  sed -i 's/#force_color_prompt/force_color_prompt/' /root/.bashrc

VOLUME /root/workspace
WORKDIR /root/app
RUN wget -q https://update.code.visualstudio.com/latest/server-linux-x64-web/stable; \
  tar -xf stable; \
  rm stable;

WORKDIR /root/app/vscode-server-linux-x64-web
RUN wget http://cdn.alomerry.com/vscode/web/server.sh
RUN chmod +x ./server.sh
# if want no token, use `--without-connection-token`
CMD ./server.sh --accept-server-license-terms --host 0.0.0.0 --without-connection-token

EXPOSE 8000
dockerfile 中的每层代表了一个操作,除了最后一层其它层都是只读的。对镜像的配置,例如设置 ENV、LABEL、CMD 等,如果命令没有使镜像的数据产生变动,是不创建新的层的,新生成的层是对上一层的变更,有点类似 git 中的 diff。创建一个容器时,实际上是在镜像上层添加了新的可写层(容器层)。
docker build
➜  docker build -t alomerry/vscode-web .
Sending build context to Docker daemon  8.192kB
Step 1/24 : FROM phusion/baseimage:focal-1.1.0
 ---> a081952496e3
Step 2/24 : ENV DEBIAN_FRONTEND noninteractive
 ---> Running in c88235acd5ad
Removing intermediate container c88235acd5ad
 ---> 23b96b938143
Step 3/24 : ENV HOME /root
 ---> Running in 8ea0c18577a9
Removing intermediate container 8ea0c18577a9
 ---> ee376367b7ea
Step 4/24 : ENV LANG en_US.UTF-8
 ---> Running in 14bb3352a1d7
Removing intermediate container 14bb3352a1d7
 ---> 2ae0d77a1dc4
Step 5/24 : ENV LANGUAGE en_US:en
 ---> Running in 505ba12d79a4
Removing intermediate container 505ba12d79a4
 ---> d4c2464f5214
Step 6/24 : ENV LC_ALL en_US.UTF-8
 ---> Running in 1f3e5ae061b0
Removing intermediate container 1f3e5ae061b0
 ---> 439c48d31f3f
Step 7/24 : ENV NVM_DIR /root/.nvm
 ---> Running in 8b9ed3a90492
Removing intermediate container 8b9ed3a90492
 ---> 653c7c1d8bb2
Step 8/24 : ARG name=vscode-web
 ---> Running in df95b647ad85
Removing intermediate container df95b647ad85
 ---> 8acec8f79e6b
Step 9/24 : ARG NODE_VERSION=16.16.0
 ---> Running in 41d7bd5a17d8
Removing intermediate container 41d7bd5a17d8
 ---> 477f94d85bb6
Step 10/24 : RUN apt-get update;   DEBIAN_FRONTEND="noninteractive" apt-get install --no-install-recommends -y   build-essential   git   net-tools   wget   zsh;   apt-get clean;   rm -rf /var/lib/apt/lists/* /var/cache/apt/archives/*
 ---> Running in 73f4461818fa
Get:1 http://security.ubuntu.com/ubuntu focal-security InRelease [114 kB]
...
Get:51 http://archive.ubuntu.com/ubuntu focal-updates/main amd64 zsh amd64 5.8-3ubuntu1.1 [707 kB]
Preconfiguring packages ...
Fetched 63.7 MB in 12s (5,299 kB/s)...
...
Setting up g++ (4:9.3.0-1ubuntu2) ...
...
Processing triggers for libc-bin (2.31-0ubuntu9.2) ...
Removing intermediate container 73f4461818fa
 ---> e2fae1b107b1
Step 11/24 : RUN curl -s http://cdn.alomerry.com/packages/nvm/install.sh | bash
 ---> Running in 7fd1130f6d5e
=> Downloading nvm from git to '/root/.nvm'
=> Cloning into '/root/.nvm'...
=> Compressing and cleaning up git repository

=> Appending nvm source string to /root/.bashrc
=> Appending bash_completion source string to /root/.bashrc
=> Installing Node.js version 16.16.0
Downloading and installing node v16.16.0...
Downloading https://nodejs.org/dist/v16.16.0/node-v16.16.0-linux-x64.tar.xz...
######################################################################## 100.0%
Computing checksum with sha256sum
Checksums matched!
Now using node v16.16.0 (npm v8.11.0)
Creating default alias: default -> 16.16.0 (-> v16.16.0 *)
=> Node.js version 16.16.0 has been successfully installed
=> Close and reopen your terminal to start using nvm or run the following to use it now:

export NVM_DIR="$HOME/.nvm"
[ -s "$NVM_DIR/nvm.sh" ] && \. "$NVM_DIR/nvm.sh"  # This loads nvm
[ -s "$NVM_DIR/bash_completion" ] && \. "$NVM_DIR/bash_completion"  # This loads nvm bash_completion
Removing intermediate container 7fd1130f6d5e
 ---> 1259cd840d61
Step 12/24 : RUN . ${NVM_DIR}/nvm.sh && nvm install ${NODE_VERSION} && nvm alias default ${NODE_VERSION} && nvm use default ${NODE_VERSION}
 ---> Running in 1506853c1c65
v16.16.0 is already installed.
Now using node v16.16.0 (npm v8.11.0)
default -> 16.16.0 (-> v16.16.0 *)
Now using node v16.16.0 (npm v8.11.0)
Removing intermediate container 1506853c1c65
 ---> 3495add72751
Step 13/24 : ENV NODE_PATH $NVM_DIR/versions/node/v${NODE_VERSION}/lib/node_modules
 ---> Running in 2fb1fda41c30
Removing intermediate container 2fb1fda41c30
 ---> b1d103271fe7
Step 14/24 : ENV PATH $NVM_DIR/versions/node/v${NODE_VERSION}/bin:$PATH
 ---> Running in 7a5fe06a7938
Removing intermediate container 7a5fe06a7938
 ---> 4911870b76db
Step 15/24 : RUN npm config set registry https://registry.npm.taobao.org;   npm install -g yarn   RUN yarn config set registry https://registry.npmmirror.com;   git config --global user.name "Alomerry Wu";   git config --global user.email "alomerry.wu@gmail.com"
 ---> Running in 7669971953db
npm WARN config global `--global`, `--local` are deprecated. Use `--location=global` instead.
npm WARN tar TAR_ENTRY_INVALID checksum failure
npm WARN tar TAR_BAD_ARCHIVE: Unrecognized archive format
Removing intermediate container 7669971953db
 ---> 06646e86813e
Step 16/24 : RUN rm -rf /etc/cron.daily/apt;   sed -i 's/#force_color_prompt/force_color_prompt/' /root/.bashrc
 ---> Running in 63f6352e6099
Removing intermediate container 63f6352e6099
 ---> c6614419dca4
Step 17/24 : VOLUME /root/workspace
 ---> Running in c187407598b5
Removing intermediate container c187407598b5
 ---> 2511c97bed1e
Step 18/24 : WORKDIR /root/app
 ---> Running in 025eb746e357
Removing intermediate container 025eb746e357
 ---> 4c66a3f2736d
Step 19/24 : RUN wget -q https://update.code.visualstudio.com/latest/server-linux-x64-web/stable;   tar -xf stable;   rm stable;
 ---> Running in 67f118ea7047
Removing intermediate container 67f118ea7047
 ---> 91c34ca5e3ea
Step 20/24 : WORKDIR /root/app/vscode-server-linux-x64-web
 ---> Running in c4d73e38fb7f
Removing intermediate container c4d73e38fb7f
 ---> 326e349e3afc
Step 21/24 : RUN wget http://cdn.alomerry.com/vscode/web/server.sh
 ---> Running in 00e2ffda99bf
--2022-08-18 06:47:28--  http://cdn.alomerry.com/vscode/web/server.sh
Resolving cdn.alomerry.com (cdn.alomerry.com)... 122.228.207.52, 122.228.207.53, 122.228.207.54, ...
Connecting to cdn.alomerry.com (cdn.alomerry.com)|122.228.207.52|:80... connected.
HTTP request sent, awaiting response... 200 OK
Length: 239 [text/x-sh]
Saving to: ‘server.sh’

     0K                                                       100% 17.2M=0s

2022-08-18 06:47:28 (17.2 MB/s) - ‘server.sh’ saved [239/239]

Removing intermediate container 00e2ffda99bf
 ---> c6cdde9ee8b8
Step 22/24 : RUN chmod +x ./server.sh
 ---> Running in b74cfae50f43
Removing intermediate container b74cfae50f43
 ---> 7935785732b8
Step 23/24 : CMD ./server.sh --accept-server-license-terms --host 0.0.0.0 --without-connection-token
 ---> Running in 21283b2202ed
Removing intermediate container 21283b2202ed
 ---> 0dc8de14002a
Step 24/24 : EXPOSE 8000
 ---> Running in b41441c857df
Removing intermediate container b41441c857df
 ---> 16bd785bdd91
Successfully built 16bd785bdd91
Successfully tagged alomerry/vscode-web:latest
docker history
➜  docker history alomerry/vscode-web
IMAGE          CREATED         CREATED BY                                      SIZE      COMMENT
16bd785bdd91   2 minutes ago   /bin/sh -c #(nop)  EXPOSE 8000                  0B
0dc8de14002a   2 minutes ago   /bin/sh -c #(nop)  CMD ["/bin/sh" "-c" "./se…   0B
7935785732b8   2 minutes ago   |2 NODE_VERSION=16.16.0 name=vscode-web /bin…   239B
c6cdde9ee8b8   2 minutes ago   |2 NODE_VERSION=16.16.0 name=vscode-web /bin…   239B
326e349e3afc   2 minutes ago   /bin/sh -c #(nop) WORKDIR /root/app/vscode-s…   0B
91c34ca5e3ea   2 minutes ago   |2 NODE_VERSION=16.16.0 name=vscode-web /bin…   215MB
4c66a3f2736d   2 minutes ago   /bin/sh -c #(nop) WORKDIR /root/app             0B
2511c97bed1e   2 minutes ago   /bin/sh -c #(nop)  VOLUME [/root/workspace]     0B
c6614419dca4   2 minutes ago   |2 NODE_VERSION=16.16.0 name=vscode-web /bin…   3.3kB
06646e86813e   2 minutes ago   |2 NODE_VERSION=16.16.0 name=vscode-web /bin…   10.6kB
4911870b76db   2 minutes ago   /bin/sh -c #(nop)  ENV PATH=/root/.nvm/versi…   0B
b1d103271fe7   3 minutes ago   /bin/sh -c #(nop)  ENV NODE_PATH=/root/.nvm/…   0B
3495add72751   3 minutes ago   |2 NODE_VERSION=16.16.0 name=vscode-web /bin…   8.76kB
1259cd840d61   3 minutes ago   |2 NODE_VERSION=16.16.0 name=vscode-web /bin…   119MB
e2fae1b107b1   3 minutes ago   |2 NODE_VERSION=16.16.0 name=vscode-web /bin…   300MB
477f94d85bb6   4 minutes ago   /bin/sh -c #(nop)  ARG NODE_VERSION=16.16.0     0B
8acec8f79e6b   4 minutes ago   /bin/sh -c #(nop)  ARG name=vscode-web          0B
653c7c1d8bb2   4 minutes ago   /bin/sh -c #(nop)  ENV NVM_DIR=/root/.nvm       0B
439c48d31f3f   4 minutes ago   /bin/sh -c #(nop)  ENV LC_ALL=en_US.UTF-8       0B
d4c2464f5214   4 minutes ago   /bin/sh -c #(nop)  ENV LANGUAGE=en_US:en        0B
2ae0d77a1dc4   4 minutes ago   /bin/sh -c #(nop)  ENV LANG=en_US.UTF-8         0B
ee376367b7ea   4 minutes ago   /bin/sh -c #(nop)  ENV HOME=/root               0B
23b96b938143   4 minutes ago   /bin/sh -c #(nop)  ENV DEBIAN_FRONTEND=nonin…   0B
a081952496e3   11 months ago   CMD ["/sbin/my_init"]                           0B        buildkit.dockerfile.v0
<missing>      11 months ago   ENV DEBIAN_FRONTEND=teletype LANG=en_US.UTF-…   0B        buildkit.dockerfile.v0
<missing>      11 months ago   RUN |1 QEMU_ARCH= /bin/sh -c /bd_build/prepa…   151MB     buildkit.dockerfile.v0
<missing>      11 months ago   COPY . /bd_build # buildkit                     40.4kB    buildkit.dockerfile.v0
<missing>      11 months ago   ARG QEMU_ARCH                                   0B        buildkit.dockerfile.v0
<missing>      11 months ago   /bin/sh -c #(nop)  CMD ["bash"]                 0B
<missing>      11 months ago   /bin/sh -c #(nop) ADD file:d2abf27fe2e8b0b5f…   72.8MB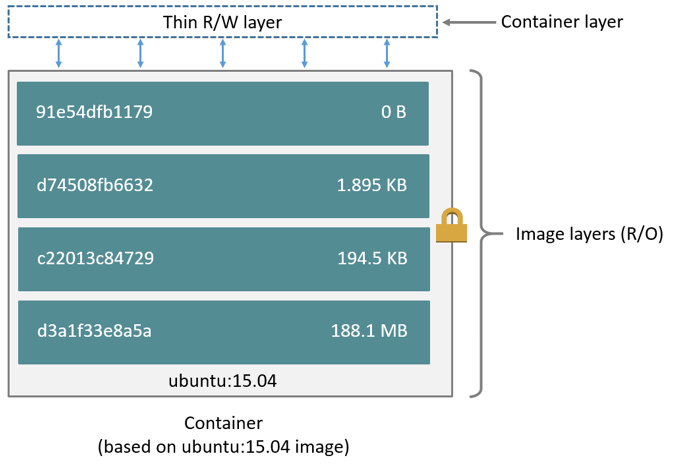
修改时复制策略 copy-on-write (CoW):
- 读取 从最上层镜像开始查找,往下找,找到文件后读取并放入内存,若已经在内存中了直接使用。
- 添加 直接在最上面的容器层可写层添加文件,不会影响镜像层。
- 修改 上往下层寻找文件,找到后复制到容器可写层,然后对容器来说,可以看到的是容器层的这个文件,看不到镜像层里的文件。容器在容器层修改这个文件。
- 删除 从上往下层寻找文件,找到后在容器中记录删除。即并不会真正的删除文件,而是软删除。这将导致镜像体积只会增加,不会减少。
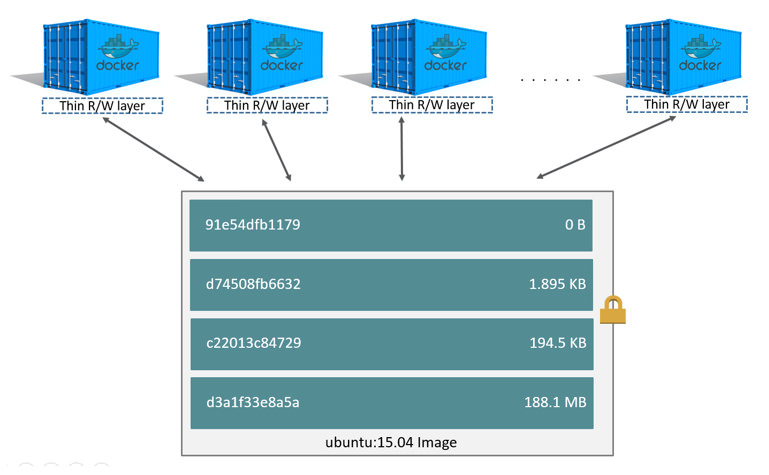
同一台机器上运行的多个容器依赖同一个镜像时,底部层实际上使用的都是同一个只读的镜像层,各个容器拥有自己的可写容器层。
对于文件只增加不减少问题,我们应当在同一层做增删操作,从而减少镜像体积。因此对于下面的写法:
From ubuntu
RUN apt-get update
RUN apt-get install vim
更好的写法应该是:
From ubuntu
RUN apt-get update && apt-get install vim
当有多个容器依赖同一个镜像时,底部层实际上使用的都是同一个只读的镜像层,各个容器拥有自己的可写容器层。
Best Prictice
- 尽量合并指令避免过多 layer
- COPY 不需要预先创建父目录
- 优先使用 COPY 而不是 ADD
- 镜像最小化
- 仅安装必要的软件和文件 例如,如果需要便捷的 COPY . /workspace/,则可以通过在目录下添加 .dockerignore 文件来忽略不需要打包进镜像的文件,参考这里 (opens new window)。
- 充分利用镜像之间的缓存共享
- 对于 ADD/COPY 命令,只有 COPY 文件的 cksum 发生变化,才会重新执行,不然则会利用上次的缓存。
- 对于 RUN 命令,如果本地任何镜像中存在相同的文件层,则会直接重用。所谓相同,指继承于相同的父镜像、且该命令之前从 FROM 开始执行了相同的会影响文件层的构建命令(RUN、COPY、ADD 等)。 如果有依赖包安装步骤,例如 yarn install,不要一次性 COPY 整个源码目录(目录下任何一个文件变化都会造成缓存失效),而应该先 COPY yarn.lock /workspace/ 然后执行 RUN yarn install,再 COPY . /workspace,如此只要依赖定义文件 yarn.lock 不变(大多数情况),就可利用缓存而不需要从头 yarn install,更多信息可参考这里 (opens new window)。
- 在 RUN 命令里添加的临时文件必须在这条命令的最后删除
- 正例:
RUN wget -q https://xxx/packages/xxx/xxx.tar.gz && \ tar -xf package.tar.gz && \ cd package && \ ./configure && make && make install && rm -rf ../package- 反例:
RUN wget https://xxx/packages/xxx/xxx.tar.gz && \ tar -xf package.tar.gz && \ cd package && \ ./configure && make && make install RUN rm -rf ../package - 如果通过解压 tar.gz 文件用于编译安装软件,例如编译安装 openresty,不建议直接将 tar.gz 文件 ADD 进镜像中(ADD 后将无法再通过 RUN rm 命令清除占用的空间,则会增大最后的镜像的大小),建议将 tar.gz 放在 OSS srepublic 上,通过在一条 RUN 命令中完成下载、解压、编译安装最后删除的过程。 下载文件统一用 wget -q 而不是 curl。
- 解压缩统一用 tar -xf,不要加 -v 以减少输出,不用加 -z 因为会自动检测,必要的话可以加 -C [dir] 指定解压到的目录
- 在 RUN 指令中慎用 chmod 和 chown,他们会产生额外的文件层,chmod 命令可以在源文件上执行,COPY 的时候权限会被保留。
Case
优化一个 dockerfile
下面是一个 alomerry/algorithm 项目初期的构建版本:
通过上面的学习,可以来优化一下:
TIP
jekyll 构建时会忽略时间是未来的 markdown,基础镜像中默认是 UTC,docker run 的时候最好加上
-v /etc/timezone:/etc/timezone:ro -v /etc/localtime:/etc/localtime:roDocker Remote / Docker Context
- https://medium.com/@ssmak/how-to-enable-docker-remote-api-on-docker-host-7b73bd3278c6
- https://blog.csdn.net/u013670453/article/details/115971259
- https://www.docker.com/blog/how-to-deploy-on-remote-docker-hosts-with-docker-compose/
常用
docker 避免一直 sudo
sudo groupadd docker创建组sudo gpasswd -a ${USER} docker将用户添加到该组,例如 xxx 用户sudo systemctl restart docker重启 docker-daemon
清理
- 批量删除已停止的容器
docker rm $(docker ps -qf status=exited) - 清除不再使用的镜像
docker image prune -a
拷贝容器文件到宿主机
docker cp <containerId>:<fileName> <hostPath>
清理 docker container/image/volume[3]
- 清理所有停止运行的容器
docker container prune # or docker rm $(docker ps -aq) - 清理所有悬挂(none)镜像
docker image prune # or docker rmi $(docker images -qf "dangling=true") - 清理所有无用数据卷
docker volume prune
Additional Resources
Reference
扩展
- build-essential 的作用
- 关于 Docker volume 挂载时文件或文件夹不存在的问题
- 如何通过 shell 和 grep 获取 docker 容器或镜像的 id
- images and layers
- container and layers
- https://www.infoq.cn/article/3-simple-tricks-for-smaller-docker-images
- https://itnext.io/3-simple-tricks-for-smaller-docker-images-f0d2bda17d1e
- https://www.cnblogs.com/woshimrf/p/docker-container-lawyer.html


